Using APC you can greatly speed up Prestashop. If you are familiar with APC, it stands for Alternative PHP Cache. What it does is kind of complicated to explain. On a basic level, it caches the compiled byte code for PHP files while optimizing them.
The way PHP works is when someone accesses your site, your server retrieves the file from the disk, then compiles it to byte code and servers it to the person viewing your website. With APC, your PHP is already compiled in byte code and stored in the memory on the server. So it totally eliminates the time of retrieving the file from disk and the time spent compiling. Plus, it has already optimized the byte code for speed. Warning, this is an advanced tutorial, if you do not know what you are doing, find or hire someone that does.
The best part about APC is that it is a free framework that is pretty easy to install on your server.
Keep in mind to install this you will either need a VPS account or a dedicated server and you will need SSH access to the server. Also, you will need a SSH client, I use putty. This tutorial is geared towards servers using Centos 6 and Apache since they are the most popular software package for servers these days.
First thing you need to do is SSH into your server. Once in you will need to run this to install pecl, so you can install APC through yum package.
yum install php-pear php-devel httpd-devel pcre-devel gcc make
Now you have the packages you need and can install APC
pecl install apc
You should see an output like this once you run that command.
WARNING: channel "pecl.php.net" has updated its protocols, use "pecl channel-update pecl.php.net" to update downloading APC-3.1.9.tgz ... Starting to download APC-3.1.9.tgz (155,540 bytes) .................................done: 155,540 bytes 54 source files, building running: phpize Configuring for: PHP Api Version: 20090626 Zend Module Api No: 20090626 Zend Extension Api No: 220090626 config.m4:180: warning: AC_CACHE_VAL(PHP_APC_GCC_ATOMICS, ...): suspicious cache-id, must contain _cv_ to be cached ../../lib/autoconf/general.m4:1974: AC_CACHE_VAL is expanded from... ../../lib/autoconf/general.m4:1994: AC_CACHE_CHECK is expanded from... config.m4:180: the top level config.m4:180: warning: AC_CACHE_VAL(PHP_APC_GCC_ATOMICS, ...): suspicious cache-id, must contain _cv_ to be cached ../../lib/autoconf/general.m4:1974: AC_CACHE_VAL is expanded from... ../../lib/autoconf/general.m4:1994: AC_CACHE_CHECK is expanded from... config.m4:180: the top level Enable internal debugging in APC</div> </div>[no] : Enable per request file info about files used from the APC cache [no] : Enable spin locks (EXPERIMENTAL) [no] : Enable memory protection (EXPERIMENTAL) [no] : Enable pthread mutexes (default) [yes] : Enable pthread read/write locks (EXPERIMENTAL) [no] :</pre>Now you have to configure APC. I am installing APC on a VPS account with 512MB ram, so I only want to dedicate 128mb to APC. To configure APC, type this command. I am using vi as the text editor since it is the default in Centos.
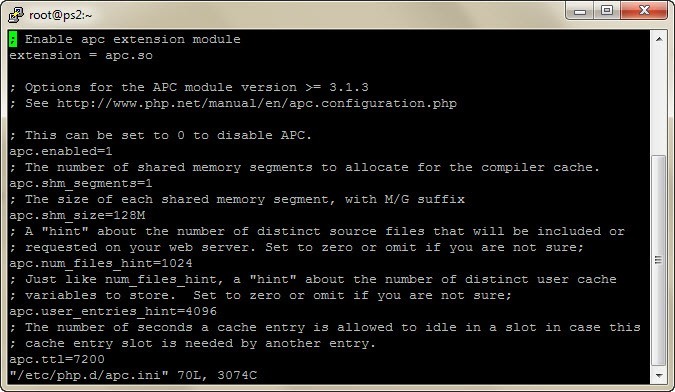
vi /etc/php.d/apc.iniIf everything worked right, you should see something like this.
Now in vi press i to edit the file. You want to make sure that apc.enabled is set to 1 like in the example above. You also want to figure out how much memory to allocate. Once you have done that, press escape to get out of editing mode. Now press shift + ; you should see a : at the bottom of the page. Press x and hit enter and the changes will be saved.
Next lets enable APC
echo "extension=apc.so" > /etc/php.d/apc.ini
Now you have to restart Apache for the changes to take effect.
service httpd restart
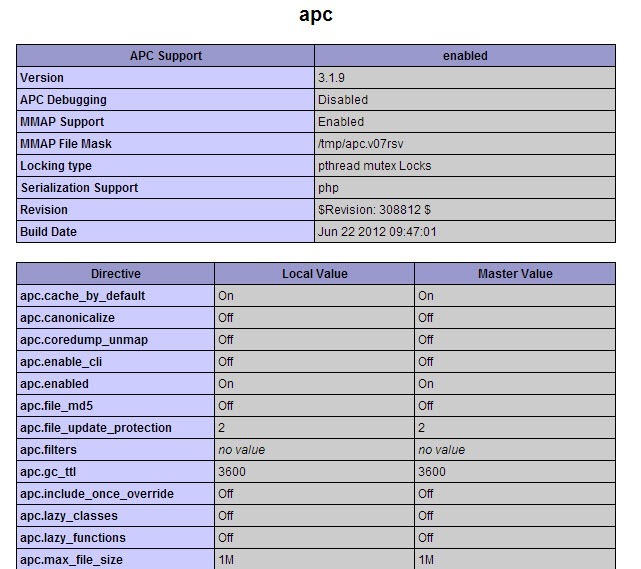
Now check your info.php file and make sure that everything worked correctly. It should look something like this.
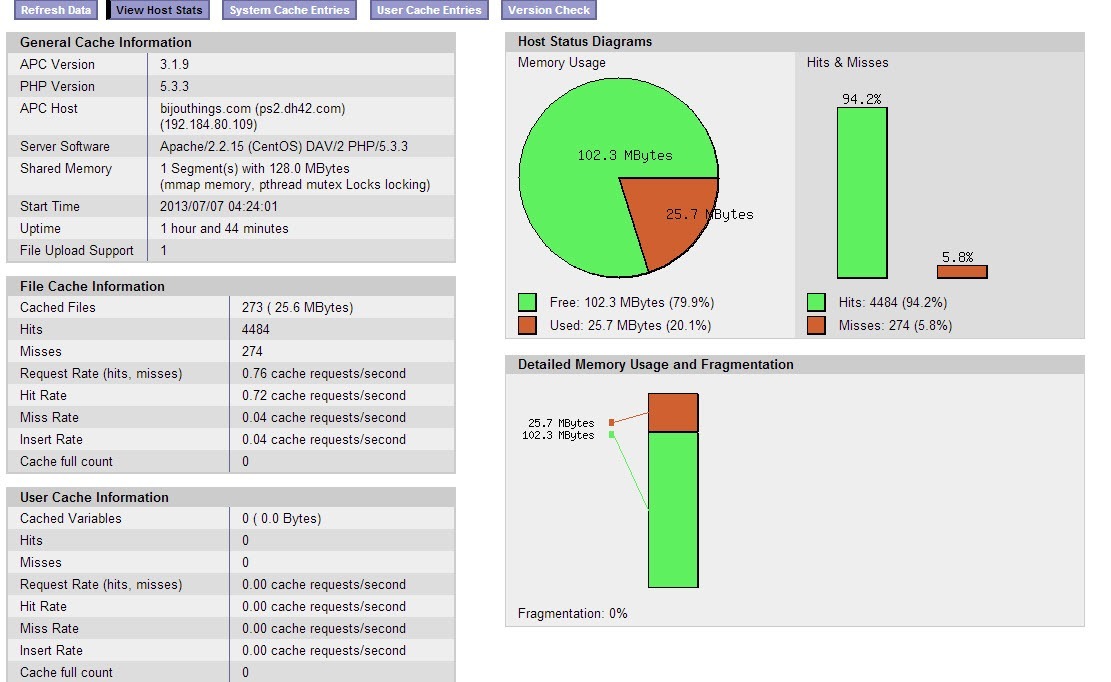
Now this step is optional and might be a little difficult. APC has a control panel that you can install to see how effective it is. The locations of the files depend on what software your server is running. Mine is running zPanel, so this is what I would type for my location. Notice how my domain is in the path, so you cannot just copy and paste this.
/var/www/html/apc.php /var/zpanel/hostdata/zadmin/public_html/bijouthings_com/
This copies the apc.php file to the web hosting space so that you can access it. Before you can access it, you need to edit it and change the password. So I ran this next.
vi /var/zpanel/hostdata/zadmin/public_html/bijouthings_com/apc.phpOnce you have changed the user name and password, you can view the control panel at yoursite.com/apc.php It will tell you how APC is working for your site. Here is a shot of my control panel.
Now you can turn debug profiling on your site a few times and watch the memory load drop and the speed increase. For APC to work, all the php files need to be loaded so it might take a day or two before the cache is totally filled and functional.
I have set up two sites on the exact same server with identical accounts and identical installations of Prestashop. Here is a screen shot of the debug on the site not running APC.
Now the site with APC
Notice how everything is compiled faster on the shop running APC. Also notice how the memory usage is a lot lower, making everything faster. You can actually test these two sites out for yourself.
These sites has since been disabled
Non APC Prestashop Site : Invoice42.com
APC Prestashop Site: Bijouthings.com
Good luck and remember this is an advanced tutorial and if you do not know what you are doing, hire someone to do it.
</div> </div></div></div>
About the Author: Lesley Paone
Lesley has worked in e-commerce for over a decade, and is the founder of dh42. Starting out with PrestaShop and brancing out into other platforms like Shopify. He loves all things e-commerce and loves a challenge, in his spare time he helps moderate several forums on SEO, e-commerce, as well as the PrestaShop forum. If you have any questions for him about any of his articles just use our contact form to contact him.


