One metric that search engines use to rank your site is speed. Not only do most search engines use this method, many studies have found that page load times directly effect conversion rates. That means people do not wait on slow sites to load, they just go to your competitors. There are two ways to speed your site up, speeding your server up and optimizing your site. I am going to show you how to optimize your site using a standard installation of Prestashop 1.4.9. We will be using
Google Page speed and Yahoo Yslow for this tutorial. I am using the browser extensions, but you can also use the tools online.
First things first..
The optimization should be done after you have made all of your design changes. It relies on a couple different caching methods and things of that nature, so it is best to have the design settled on. Also, you should be running on a LAMP stack, some of this does not apply to Windows servers.
Prestashop settings
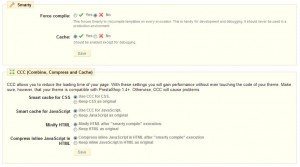
In your back office, go to your preferences tab and select performance, then make your settings look like the image below. Notice I have turn on the caching and combine, compress and cache functions, as well as disabling force compiling of the shop.

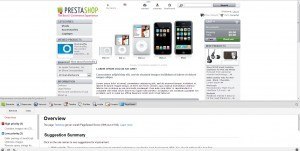
Next click on the tools tab and go to generators. From here you can apply directives that will speed your site up through your .htaccess file. Ok, lets see where we stand right now. I am going to analyze both a product page and the main page of the site.

Now we know where the site stands. 77 on the product pages and 82 on the main index page of the site. Now these are not bad numbers, but there is a lot of room for improvement. Lets get on to that now.
The First Tool
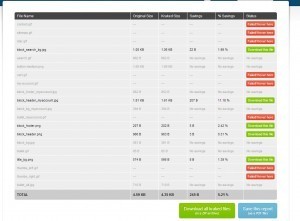
I like to use a little tool called Kraken to compress images, it is a chrome browser extension. You can either download it or go to their site kraken.io. After running the front page through Kraken, you can see several images are reduced in size. The errors on the page are the GIF files, Kraken does not work on them.

Now you want to download the zip file that Kraken produces. Open the zip file and extract it and then open your FTP program. I use Filezilla for most everything. Also take note of the locations of the files that have been compressed, you will need to upload the files to their proper locations and overwrite the existing files. Most of the files in my zip were from the themes/prestashop/img folder, with the exception of one. It was from the modules/blockstore directory.

Moving on..
This might be where things get a little difficult for some people. We need to start editing the template files. Using your FTP program, navigate to the themes/prestashop directory and open the header.tpl in your favorite editor, I am using Sublime Text for this tutorial. One you have it open, you are going to be looking for the logo. See the picture below.
![]()
For some reason, Prestashop appends the time on the logo url as a query string. This is not need, so we will delete it off. The only thing that you want to delete, is what is highlighted, ?{$img_update_time}
Conclusion
In the next in this series, we are going to start editing the css files. Things are going to get a little bit harder, but I will try to keep it where most people can understand.
About the Author: Lesley Paone
Lesley has worked in e-commerce for over a decade, and is the founder of dh42. Starting out with PrestaShop and brancing out into other platforms like Shopify. He loves all things e-commerce and loves a challenge, in his spare time he helps moderate several forums on SEO, e-commerce, as well as the PrestaShop forum. If you have any questions for him about any of his articles just use our contact form to contact him.
